Welcome!
In this tutorial, you’ll learn basics about variables in Convoworks using the example of the ”Order Pizza” application.
You’ll learn about:
- Setting variables
- Outputting and expressions
- Service variables
- Built-in variables
There are three types of variables in ConvoWorks: service, runtime, and built-in.
You can use them to mix static text with dynamic values when outputting display or speech, to test and adjust workflow (IF/ELSE element) or to dynamically set component properties.
Runtime variables are set during service execution. They are created using a Set Parameter element.
For this tutorial, we need just the built-in and service variables.
We’re going to use them for some of the aforementioned examples, starting with setting and outputting text.
Add a service variable
We’re going to start by storing the name of the app into a service variable, and outputting it wherever that name is used.
Service variables are available everywhere in the service but can not be updated during app runtime. They’re useful for storing constants or configuration values.
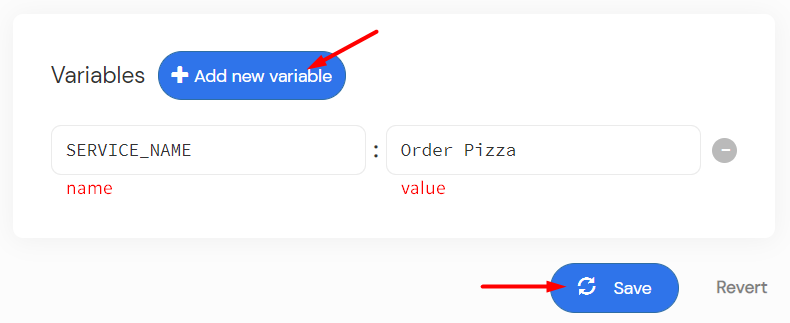
Select the Variables menu item on the ”Order Pizza” service page. Add a new variable by clicking Add new variable button.
Enter the name of the variable on the left as SERVICE_NAME. Next, enter the value of the variable on the right as Order Pizza. No need to put quotes around the value – variables are by default set as strings.
We’re going to output the value in the service text using JUEL (Java Unified Expression Language) – simple expression syntax that looks like this: ${expression}.
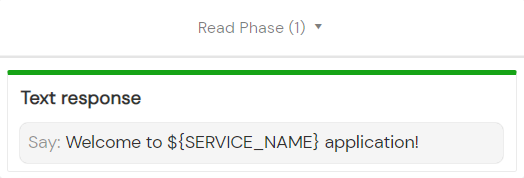
Switch back to the Editor tab and replace all instances of ”Order Pizza” text in the Text responses with ${SERVICE_NAME} expression.
The welcome message text should now look like this:
Test to check if everything is working correctly.
Test built-in variables
There’s a number of different built-in Convoworks variables you can take advantage of in your service. In this tutorial, we’re going to demonstrate just a few: returning, failure_count, and request.intentName. You can find the full list of system variables and find out more about expression language here: Expression language.
First, in the Pizza Menu block drag and drop the IF element above the ”Which pizza from the menu do you want” text. We’re going to add the returning variable expression. The returning variable has a boolean true value if the same block is executed multiple in a row and boolean false if we just arrived at the block. You can accomplish boolean true by using elements such as Read Block Again in the process phase/fallback containers.
Click on the IF element and in the TEST field on the right enter the following expression: ${!returning}. In the Then container place the Text response element and add the following text: ”We have two pizzas on the menu currently: Pepperoni and Margherita.”.
The IF case will only be matched and the then container read if the block wasn’t read multiple times in a row or we just arrived at the block from another block.
Save and then test the changes
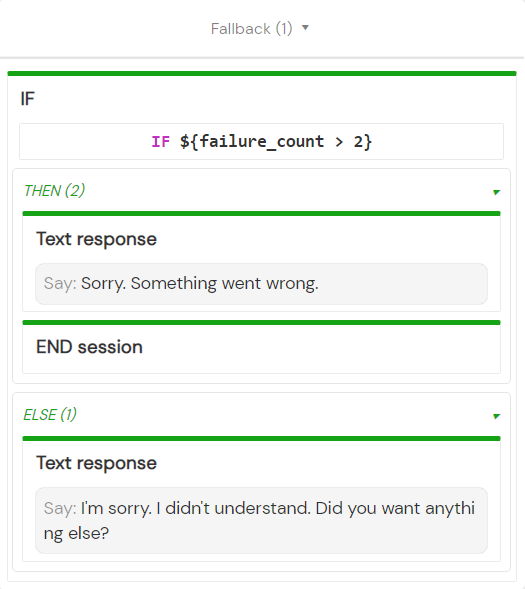
Next, we’re going to add the IF element to the Fallback container of the Exit block. After adding the element, move the ”I’m sorry..” text to the Else container of the IF element. Just hover the Text response element over the IF element and the Else container will become visible. Now click the IF element and in the Test field add: ${failure_count > 2}. Then add the Text response element with the text ”Sorry. Something went wrong.” to the Then container. Below it, place the END session element and save the changes.
We have now ensured that if the Fallback in the Exit block gets triggered more than two times, the app terminates the session.
Test in the Test page chatbox by triggering multiple fallbacks in the Exit block.
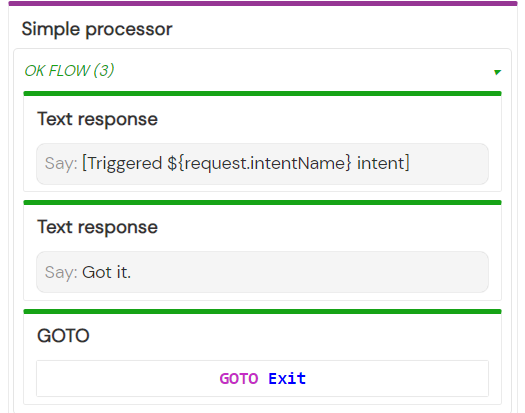
For the last part of this tutorial, we’re going to output request.intentName in the process phase of the Pizza Menu block. Place the Text response element in the OK flow of the PizzaTypeIntent above the ”Got it.” text.
Add the following text to the new element:”[Triggered ${request.intentName} intent]”. You can use the request object variables in the service testing phase.
Delete the ”Triggered..” Text response element after testing in the convo chat.


