The Service Level Platform Configuration manages the service-specific settings.
User Level Platform configuration – Admin Account Linking
After activating the Convoworks WP plugin, click on the Connect to Amazon Now. This will lead you to the Settings sub-view for Amazon Alexa configuration.
If, however, you’re working in the Convoworks Prototype, you can view the User Level Amazon Platform Configuration form by clicking on the Configuration menu item and choosing Amazon Configuration from the dropdown.
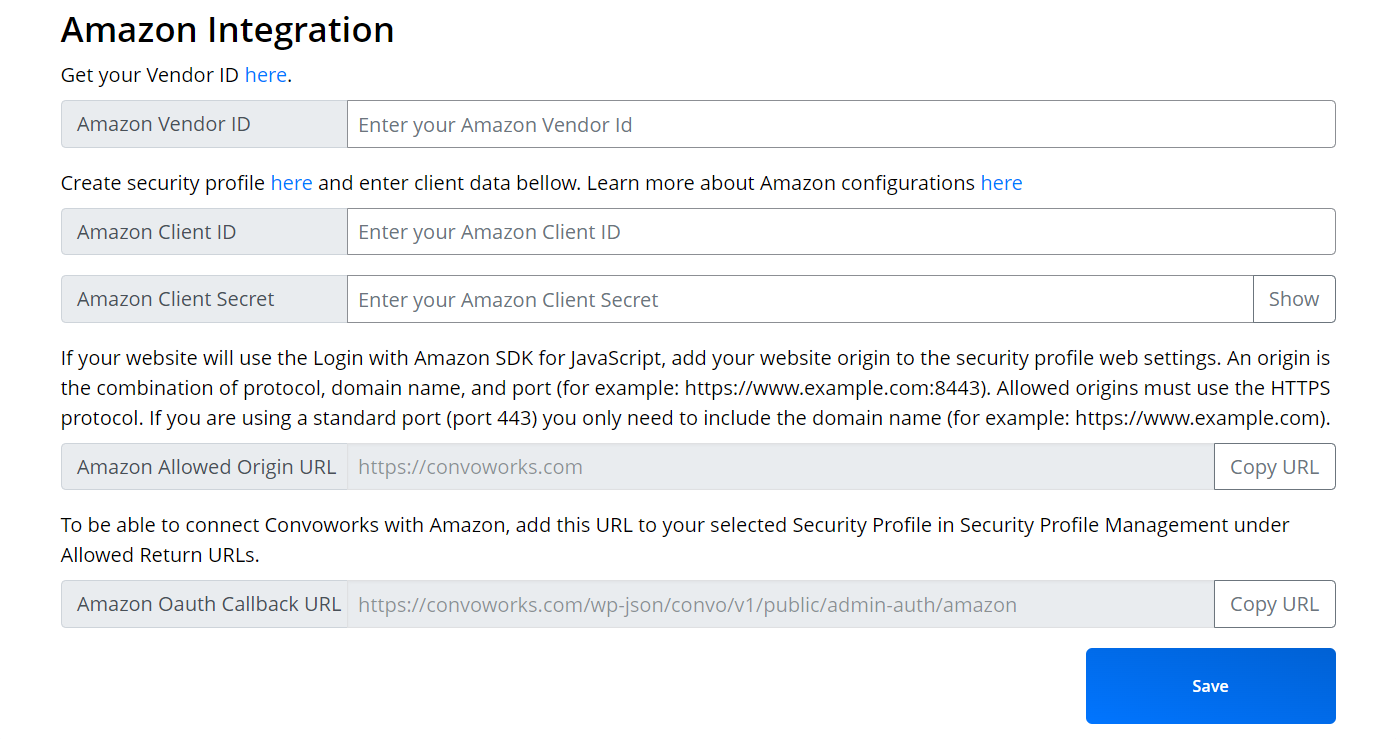
As you can see, you need the Client ID, Client Secret, and Vendor ID data. You can get that data from a Login With Amazon Security Profile. You’ll also need to add Amazon Oauth Callback URL to the list of Allowed Return URLs on your app’s Security Profile before you can finally link your Amazon account. Note that the Settings page provides you with direct links to the Amazon pages where you can find or set up the required information.
But, you can add and access those data only if you already have an Amazon developer profile set up.
Don’t worry if you don’t have one, we’ll walk you through all the steps.
1. Create an Amazon Developer account
Visit this link: https://developer.amazon.com/.
If you already have a normal Amazon account, make sure you’re signed in. You should see your initials at the top right. Hover over them and click the Complete Registration option.
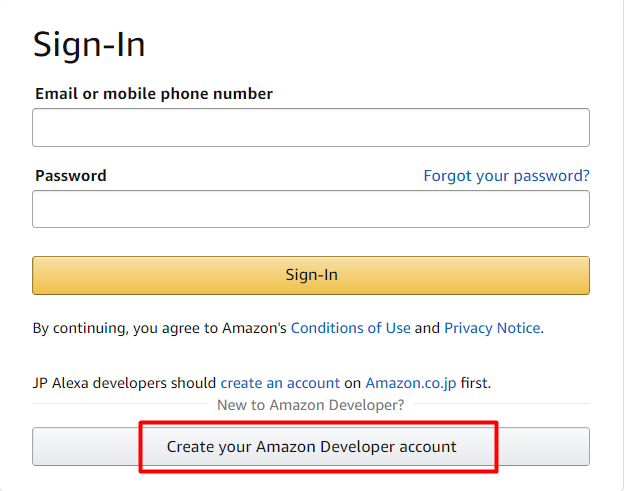
If you don’t have an existing account, click the Sign-In button at the top right. After you clicked the sign-in link, click create your Amazon Developer account on the sign-in form.
After you’ve entered in your name and your email address and your password, you’ll click the create your Amazon Developer account link. Next, Amazon will send your email address an OTP (one-time password). Go back over into your email account and get your OTP. Enter the OTP and click Create your Amazon account.
You should land on the Amazon Developer Registration page.
You’re asked to fill in more data. If you’re not part of a company, you can just put your own name in the Developer/ Company Name. Make sure you click on the link to the Amazon Developer Services Agreement and click the I agree button. Once you’ve filled out all the data, click the Submit button to finish creating the account.
You’ll be sent to the Amazon Developer Portal. If you plan on monetizing your Alexa skills, select Continue completing your profile at the bottom of the page to add payment and tax information. If multiple developers want to work on skills together, you can add additional users to your developer account in the Users Permissions tab. For more details, visit Manage user permissions.
Now that you’ve set up your account, the next step is getting your Client ID and Client Secret credentials.
2. Get Vendor ID

Click on the link provided on the Convoworks WP Settings page, or visit: https://developer.amazon.com/settings/console/mycid to get your Vendor ID.
3. Get Client ID and Client Secret
You’ll need to set up a Login with Amazon Security Profile to get your Client ID and Client Secret.

If you’re using Convoworks WP, just click on the link provided on the Convoworks WP Settings page. Otherwise, log into your account then visit https://developer.amazon.com/dashboard and click on the Login with Amazon menu item.
You can get the Client ID and Client Secret credentials by clicking on the Show Client ID and Client Secret if you have an existing Security Profile. If you don’t have a Security Profile, refer to the section below.
Create a New Security Profile
To register a new Security Profile click on the Create a New Security Profile. You have to supply your own Privacy Notice URL. The Privacy Notice URL is the location of your company or application’s privacy policy, but for test purposes, you can just add any URL.
4. Add a return URL
The next step is to add your return URL to the list of Allowed Return URLs on your app’s Security Profile. The Allowed Return URL is the endpoint of your web app which provides the Login With Amazon Authorization Grant Code URL. More information about the Login With Amazon Authorization Grant Code URL can be found here: Authorization Code Grant.

If you are using the Convoworks WordPress plugin, you can copy your Amazon Oauth Callback URL.
For Convoworks Prototype the URL is https://mydomain.com/rest_public/convo/v1/admin-auth/amazon
 Open the Login with Amazon Console and locate your Security Profile in the Login with Amazon Configurations table. Hover over the button and select the Web Settings menu item. Once you’ve landed on the page, click the Edit button.
Paste the Amazon Oauth Callback URL (Convoworks WP) and click Save.
If you haven’t already, switch back to the Convoworks GUI and fill out the Configuration there.
6. Link to Amazon Account
As the last step, press “Save”, then “Connect” and you should be redirected to the Amazon consent screen. After you allow access, your Convoworks installation is ready.
On the Convoworks Prototype, click on the Configuration menu item and choose Link Amazon Account from the dropdown. Sign in to your account.
And that’s it for the User Level Configuration.
Service Level Platform Configuration for service propagation
Service level configuration requires you to have a Convoworks service you want to propagate.
Propagation allows Convoworks to deploy your app for you to a platform of your choosing, in this case, Amazon, and the Service Level Platform Configuration grants you access to service propagation.
Please note that the following properties of the Service Meta affect the configuration and the propagation result:
- Service Name – service name translates to the Alexa Skill invocation name in the Configuration section
- Default Locale for Publishing Preview – this is used when getting existing publishing information of an existing Alexa Skill
- Supported Locales for Publishing Preview – this is used for interaction model builds as well for sharing publishing information across different Amazon Supported locales after the propagation was completed
To access service configuration first select the service you want to configure from the Services view of the Convoworks Editor.
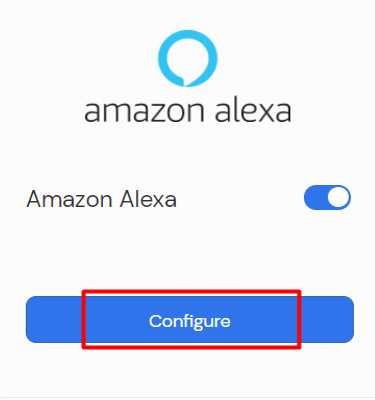
Then open the Configurations menu item, scroll down and click the Configure button on an Amazon Alexa card.
This will take you to the Amazon Alexa service configuration form.
We offer two modes of configuring the service for Amazon Alexa in Convoworks. The first one is the MANUAL mode where you have to provide the Alexa Skill ID if you want direct access from the Convoworks Admin Panel to the Store Preview of your Alexa Skill. You also have to catch intents manually using the Platform Intent Reader.
The second one, the AUTO mode, is the one where the Alexa Skill Management API allows you to manage and test your Alexa Skill in Convoworks Test Panel with Amazon NLP delegate selected. It also enables service propagation. Considering its advantages, we recommend using the AUTO mode.
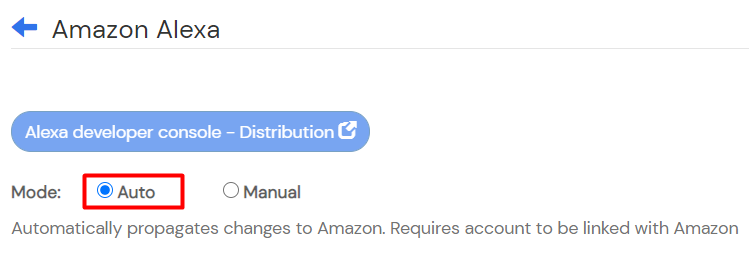
Make sure the Mode is set to AUTO. Once your configuration was created on AUTO mode, you’ll no longer have the ability to switch back to MANUAL mode. This behavior also applies when you change from MANUAL to AUTO and save the platform config. You can leave the Service ID field empty. The skill will be created and the data filled automatically. If you fill in the Service ID data, Convoworks will try to retrieve information on the skill
Optional steps for configuring the AUTO mode:
- You can change the Alexa skill‘s invocation
- Select another Interaction Model Sensitivity option if you want your skill model to respond to more user requests with the Fallback Intent.
- Enable Auto Display if you want to display text spoken by Alexa on devices that have a display
Lastly, just scroll to the bottom of the Alexa Configuration view and press “Create”. Convoworks will trigger the Alexa Skill Management API to create your Alexa Skill with all of the default intents and additional intents you have specified. You’ll notice in the top section “Building Amazon” text which will disappear in less than a minute.
Test your propagated Alexa Skill
After you have successfully propagated your changes to Amazon Alexa, just enable your skill to use in your Alexa companion app or enable it on the Test tab in Alexa Developer Console.
Steps to enable skill to test in Alexa Companion App:
- Open your App
- Tap More in the navigation
- Tap Skills & Games
- Tap Your Skills
- Scroll right to Dev on the panels below the tabs
- Tap on Dev
- Search for your skill
- Tap your skill and hit the ENABLE TO USE button
- Open the recently enabled skill on your Alexa device by invoking it.
Steps to enable skill to test in Alexa Developer Console:
- Login to your Alexa Developer Console
- Click on the Search by skill name or skill ID to find your skill
- Open the found skill and click on the Test tab.
- Make sure that the Skill testing is enabled in Development.
- Open the recently enabled skill on your Alexa device by invoking it.
Final Notes
Now you’ll be able to propagate your Intents defined in Convoworks, add additional features like Account Linking for an Alexa Skill, or configure the Skill Distribution Information and finally, submit your skill for certification.