


Appointment scheduling on your WordPress website – Now with Amazon Alexa skill
Many of the WordPress-based websites have some kind of appointment scheduling functionality. To be more precise, there are a dozen most popular plugins which are powering at least 150K websites. Hairdresser salons, dentists, online events, and many use cases require booking functionality. Wouldn’t it be great to be able to offer your customers the same functionality via smart speakers (e.g. Amazon Alexa)?
Voice assistants are on the constant rise and are proving themselves as the user interface that you will not be able to avoid in the future. Right now, developing voice apps seems reserved for the enterprise market only, primarily because of high development costs, but in the WordPress world, it can be easily changed. That is exactly what we have done and you can have your appointment booking Alexa skill in no time, for free.
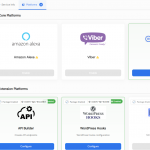
Appointment booking plugins compatibility
Since each appointment scheduling plugin has its functions and database structure, you might wonder how we solved this problem. Because it’s difficult to completely solve it in one go, our solution is a two parter.
The first is our convo-appointments package, generic appointment booking solution, not tied to any plugin, not even to WordPress. This part is focused on solving conversation design requirements, while the real data (load, create …) is delegated to the appointments context component (data source). This package comes with one dummy appointments context implementation that can serve as an example of how to implement appointments for your plugin, or just for testing the skill workflow. This package also contains a ready-to-use Alexa skill template. You can find more about it on the GitHub repository.
The second part is a concrete appointments context implementation, which internally calls required plugin functions and does required data transformations. At the moment, we are providing the implementation for the Simply Schedule Appointments WordPress plugin and you can find it in convo-wp-plugin-pack the components package. In the ideal case, your appointments plugin will already include its custom package with an appointments context implementation.
In this article, we will explain the basic functionality of the skill itself, how to install it on your installation and if you have Simply Schedule Appointments plugin, how to switch the skill to use it.
If this is your first contact with Convoworks, you might want to first check some basics in our documentation or the Convoworks basics video tutorial series.
“Schedule Appointments” – Alexa skill template overview
The appointments package is shipped with the ready-to-use Alexa skill template, whose functionality is described in this section. This template is created to be used with Amazon Alexa only and the skill requires access to the user’s full name and email address, which can be enabled in the Alexa app during the skill activation.
When we are talking about booking appointment scenarios, we should consider two main conversation flows depending on if the user already has or doesn’t have an appointment.
No appointments flow & first-time users
During the introduction phase, the user is greeted, told introductory information like business hours, and asked if they want to schedule an appointment.
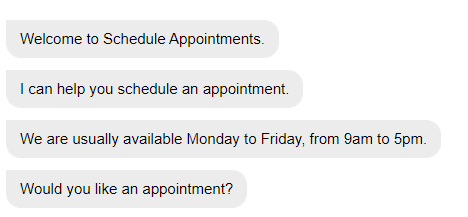
If the first-time user answers in the negative, the service offers the user some info about the skill owner’s business, and if that answer is negative as well, it reminds users that they can ask for information about the company anytime and exits.
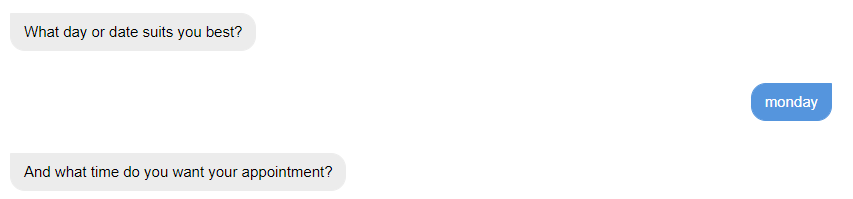
If the user answers in the affirmative, the service asks about the appointment date, then if not provided along with the date, the appointment time. Finally, the service checks availability. If the date and time are available, the service asks for booking confirmation.
If the requested date and time are not available, the user is asked to choose another time slot. In addition, the template is even capable of offering free slot suggestions.
Anytime during the service run, users can ask for help and get help in accordance with the service step they’re on. Users are also able to ask Alexa to repeat the last response, by simply saying “Repeat”.
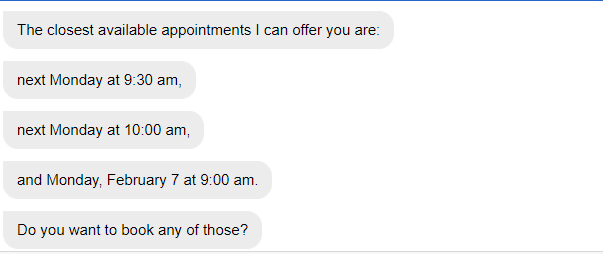
To skip most of the steps, a user can rely on a one-shot request when opening the skill, for example: “Ask Schedule appointment to schedule an appointment on Monday at 9 am”. This will send the user, if the date and time are available, right to the confirm step.
Existing appointments flow – returning user
The returning user no appointments flow is similar to the first-time user one. The exception is some changes in the text, omission of tips and introduction, as well as skipping offering to hear more about the company.

The introduction message in existing appointments flow slightly differs depending on if the user has one or more than one appointment. If the user has an upcoming appointment, after the welcome back message, the service informs the user about the one upcoming appointment with the date and time of that appointment. The service then offers the option to cancel or reschedule the appointment.
If the user has asked to cancel the appointment, the service asks for confirmation and if the answer is yes, deletes the appointment and exits. If the answer is no the service exits after a brief message.

Alexa skill setup
This section contains the instructions on how to enable appointment scheduling as an Alexa skill on your WordPress installation. First, you have to have Convoworks WP installed and connected with your Amazon developer account (check Amazon Alexa Configuration Docs or Video tutorials on YouTube). Next, you should create a new service (from the template), configure the service for Amazon Alexa, and finally, propagate it to the Amazon developer console.
Create a new service from the Schedule Appointments template
Let’s start with creating a new service from the Schedule Appointments template which is part of the convo-appointments package.
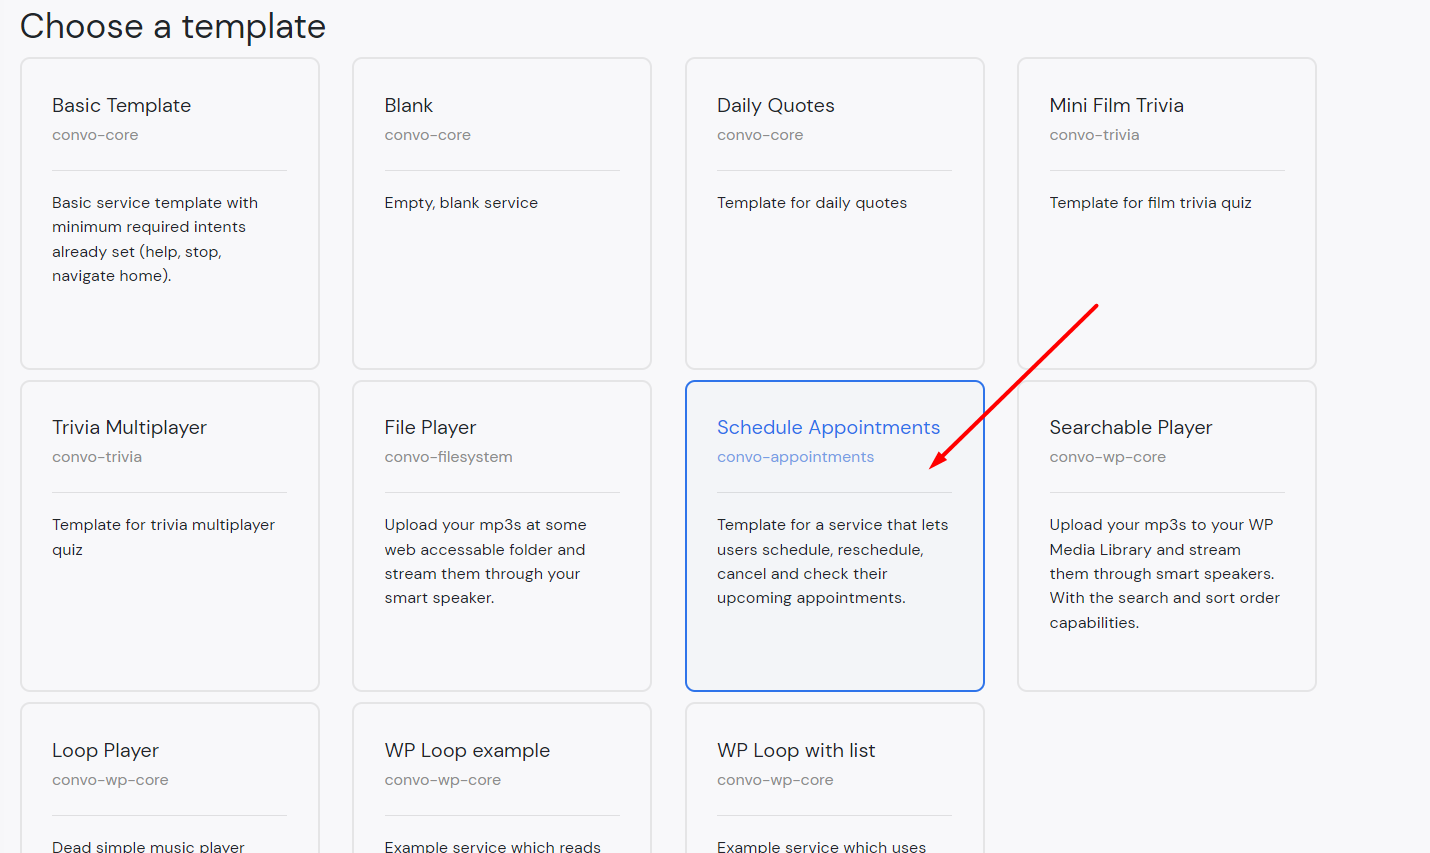
First, open the open Convoworks WP services view and click on the Create new button. Enter your service name, then select the Schedule Appointments template and press the Submit button. Keep in mind that the service name will be used by default for your Amazon Alexa skill invocation phrase. You can check skill invocation name regulations here.
Change the app name and other variables
Even though the template is ready to use, some adjustments are still necessary. Besides the appointment scheduling functionality, this template has sections with the company info and business hours that you might want to modify.
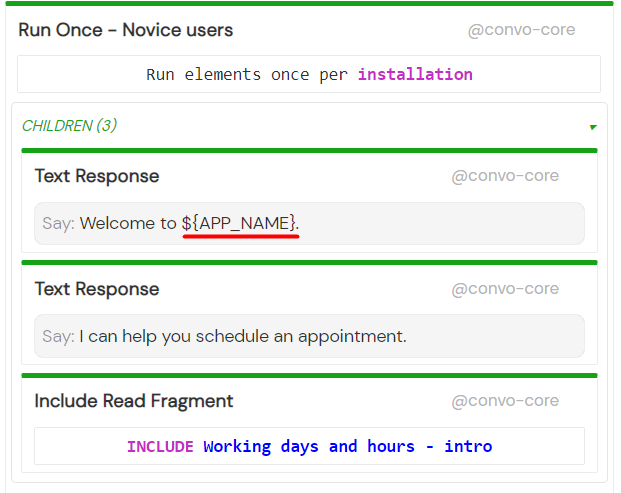
One thing you will certainly want to change is the APP_NAME variable (Variables view in service editor). This variable is used in several places in the skill (e.g. “Welcome to ${APP_NAME}”) and you should change it to fit, ideally, your company’s name. Another one that you might want to change is MAX_APPOINTMENTS_PER_PERSON which can limit the number of active appointments one user can have. There are also two variables related to formatting date and time values when speaking to the end-user. If you want to change the format, you might want to take a look at those two. More about date format options can be found in PHP docs.
Change or remove business hours info
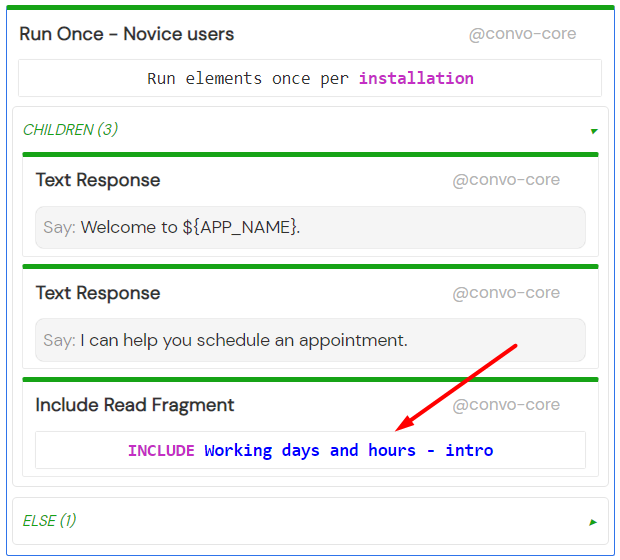
In some cases, like with first-time users, the skill will inform users about business hours. The related texts are defined in Working days and hours – intro and Working days and hours – not_allowed service fragments. The business hours definition is currently hardcoded in the service definition, so if you need to change it navigate to these two fragments and change the values to the ones which will describe your case.
Change or remove About
Your users might be interested in hearing more info about your business. The related text is defined in the Read about us conversation step. Navigate to that step and change the info about your business.
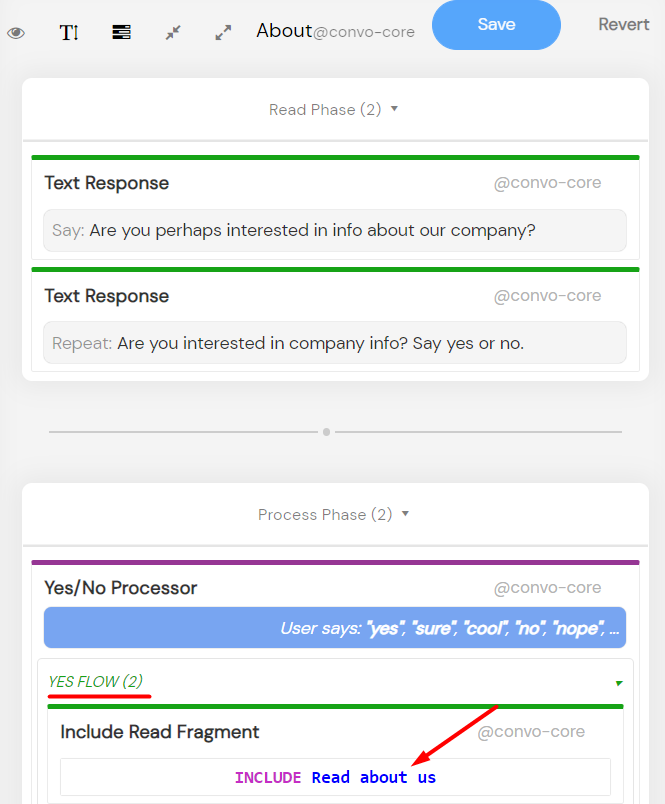
To remove the About flow, you’ll need to delete the Run once element containing the fragment in the Home block. delete the About block and delete the About processor in the Service processors.
Time zones
There are two main scenarios when we are talking about appointment scheduling and time zones.
The first is when the appointments are in-person meetings, like in a hairdresser salon or dentist visits. So if you are in LA and you are scheduling your visit to the dentist in NY, you will operate in the target time zone (NY). This is the default behavior for our appointment scheduling template.
The second mode is more appropriate for online meetings. In such a case, the user is trying to book time in their time zone and the system will do the necessary calculations and present the availability correctly in the user’s timezone.
Our components and the whole system design support both variants. It’s achieved with the Timezone mode and Timezone properties on the appointments package-related elements. The template is configured to use the Default mode which uses the appointments plugin default timezone (the first case).
If you want to change the time zone mode your service is working with, you will have to go through the template and update manually time zone component parameters. In the next release, we plan to move those two configuration options to the variables, so you will be able to change them from a single place.
Amazon Alexa Configuration
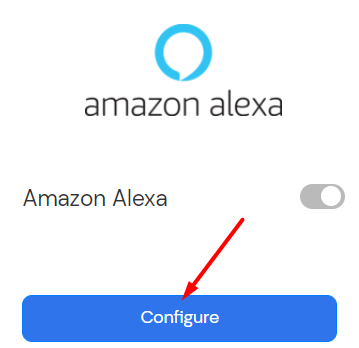
For the skill to work, we have to publish it to the Amazon Alexa developer console. Navigate to the service configuration view, and select Amazon Alexa.
This skill requires some user information, so do not forget to select Full Name and Customer Email Address in the Amazon Alexa Skill Permissions panel (see below). If you want to be able to enable a beta test for the skill, you’ll have to enter the Privacy Policy URL in the Edit Skill Store Preview section.

After filling in the information and clicking “Create” your service will be propagated to Amazon and you can head on over to the skill’s Alexa Skills Kit developer console to test.
Simply Schedule Appointments integration
If you have the Simply Schedule Appointments plugin activated on your website, you can modify the service to use that functionality and have a full-blown appointment scheduling Alexa skill. If that’s the case, while in the service editor switch toolbox to packages view and enable convo-wp-plugin-pack package. After you enable it, you will be able to add the Simply Schedule Appointments source under the Contexts tab. Once you add it, enter desired context id and select the Appointment Type you want to handle.
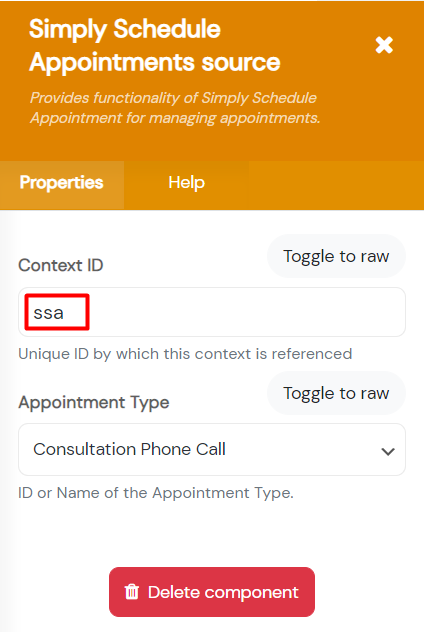
Copy the Context ID and head on over to the Variables panel. Use it to set the APPOINTMENTS variable. Do not forget to save changes.

That’s it. You’ve created a functional appointment scheduling Amazon Alexa skill using the Simply Schedule Appointments. It’s good to know that the appointments created are the same as one created through the web interface. If you installed some additional plugins, to send email notifications or do any other additional functionality, everything will work the same.
Since Convoworks v0.22.14, we included support for the Easy Appointments plugin too.
Now, even though you have a service that is fully functional, a few steps remain before it can be published on the Alexa skills store. Mainly, you have to submit the skill for certification, and in order for it to be approved, it must meet the certification requirements.
Certification requirements for booking skills
Even though we’ve fulfilled most of these requirements in our template, a few final remain that you’ll have to fulfill yourself. Below we’ve listed all the specific requirements Amazon has for booking skills and how we handled them. As well as one that remains to be completed, before submitting the skill for certification.
-
- The skill must confirm reservation details via voice, including the merchant name, before completing the transaction.
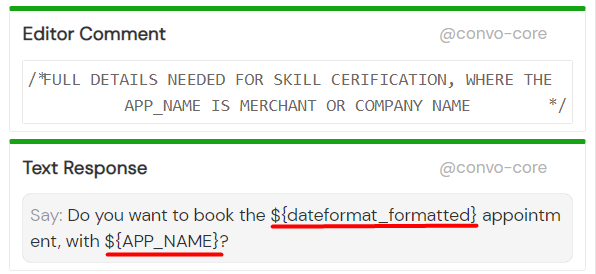
As depicted above, our template confirms these the details in the Schedule appointments – confirm block where theAPP_NAMEvariable is synonymous with the merchant name. You can modify these values or add your own variables.
- The skill must confirm reservation details via voice, including the merchant name, before completing the transaction.
-
- The skill must provide booking confirmation in all three ways listed below:
(1) Voice
(2) Home card/ SMS
(3) Email
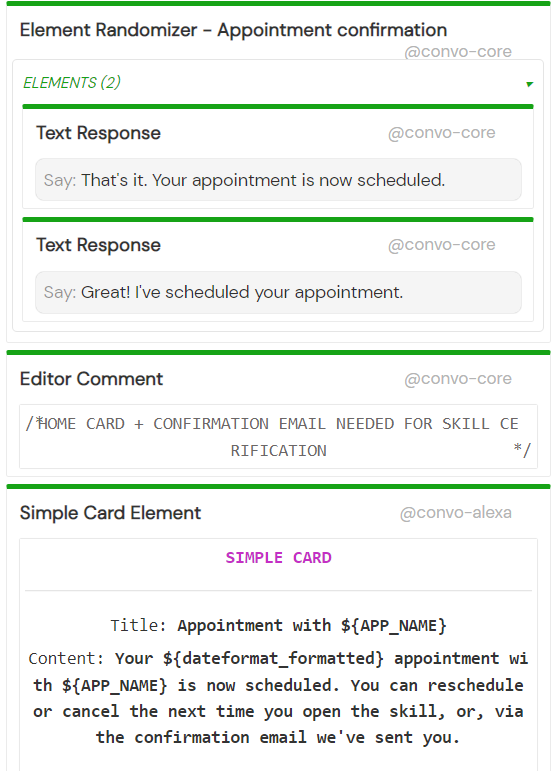
After the user confirms the appointment, they’ll receive the booking confirmation in all three ways. As you can see in the screenshot above, we use booking confirmation via home card, instead of SMS.
- The skill must provide booking confirmation in all three ways listed below:
-
- Skills that allow users to place a booking must either allow the user to cancel bookings or must tell the user how they can cancel the booking. If the skill tells the user how to cancel a booking, it must provide that information via voice and home card.
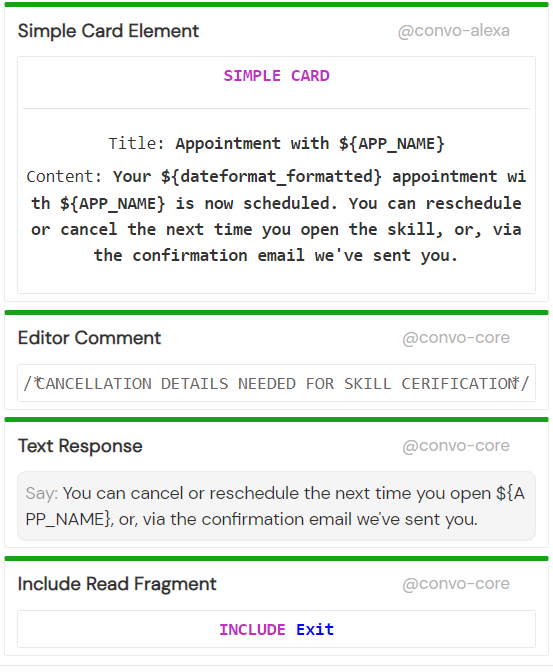
And right after the booking confirmation, we describe how the user can cancel. And while canceling via email isn’t mandatory, email confirmations are. So that’s something you should take into account when creating and testing your skill.
- Skills that allow users to place a booking must either allow the user to cancel bookings or must tell the user how they can cancel the booking. If the skill tells the user how to cancel a booking, it must provide that information via voice and home card.
-
- Lastly, make sure you describe in detail in the testing instructions how the skill meets these requirements and at what point. Otherwise, the skill might not pass the certification. You can find the testing instructions input field under the Distribution Information title in the Service Configuration view. Just click on the Edit Privacy and Compliance and scroll down.
Here’s an example of testing instructions for the Schedule appointments template:
“The skill enables users to book free appointments. The skill also allows for booking cancellation or rescheduling. After the user confirms the date and time of the appointment, they are given the info via voice and a card on how to cancel or reschedule.
The following is outputted via voice to the user after appointment confirmation: ‘That’s it. Your appointment is now scheduled. You can reschedule or cancel the next time you open the skill, or, via the confirmation email we’ve sent you.’ At the same time, this is outputted via card: Your [date + time] appointment with Schedule appointments is now scheduled. You can reschedule or cancel the next time you open the skill, or, via the confirmation email we’ve sent you.”
Conclusion
Many plugins extend WordPress functionality in many different ways. At the same time, it is a blessing and a curse. With our appointments package, we demonstrated how such issues can be avoided cheaply and efficiently.
If you use some other appointment scheduling plugin, or even better if you are a developer of such one, please contact us and we will be glad to help you with integration.


Related posts

A Dead Simple RAG Setup for WordPress: AI Chatbots for Small Websites
Discover how to set up a dead-simple RAG-based AI chatbot on your small WordPress website. With Convoworks, you can easily enable a chatbot that retrieves information directly from your pages, enhancing user experience with minimal setup. Perfect for small sites looking to leverage GPT-powered chat functionality in minutes!
VIEW FULL POST
How to Modify Your robots.txt to Prevent GPTBot from Crawling Your Site with Convoworks
Introduction Ensuring that your website’s content is accessed on your terms is essential. With an increasing number of web…
VIEW FULL POST