Elements are the most versatile component types in Convoworks. They are executed sequentially and can be nested inside one another. You can use them to output responses to users, load data, manipulate variables and as control structures (IF, Then, LOOP, INCLUDE, GOTO …).
There is no strict separation but most elements can be broken down into three main types:
- Display – allows you to output speech or text.
- Data – for fetching data from different sources
- Control structures – for directing the flow of the service and working with variables.
Display
Text Response
The Text response element takes input Text and outputs it to the user either as text or speech, depending on the platform. You can choose from two response types: Default or Reprompt.
The Reprompt type is for handling cases where the user doesn’t provide a response. If you have a Reprompt defined, the system waits for a response and prompts the user again instead of exiting.
You can use SSML in the Text field to tune up audio response and you can also output variable values using expression language. To learn more about expression language and how to use it visit this link: Expression language
The Text response element offers Alexa-only customizations like Domain, Emotion, and Emotion Intensity which help you create an even better voice experience.
Editor Log
The Editor Log Element is used to log additional information to a log file. Log messages are also displayed when using the service through the admin Test View chat, making it easy to troubleshoot and track service execution. In addition to the log message, you can set the log level.

Data
HTTP Client
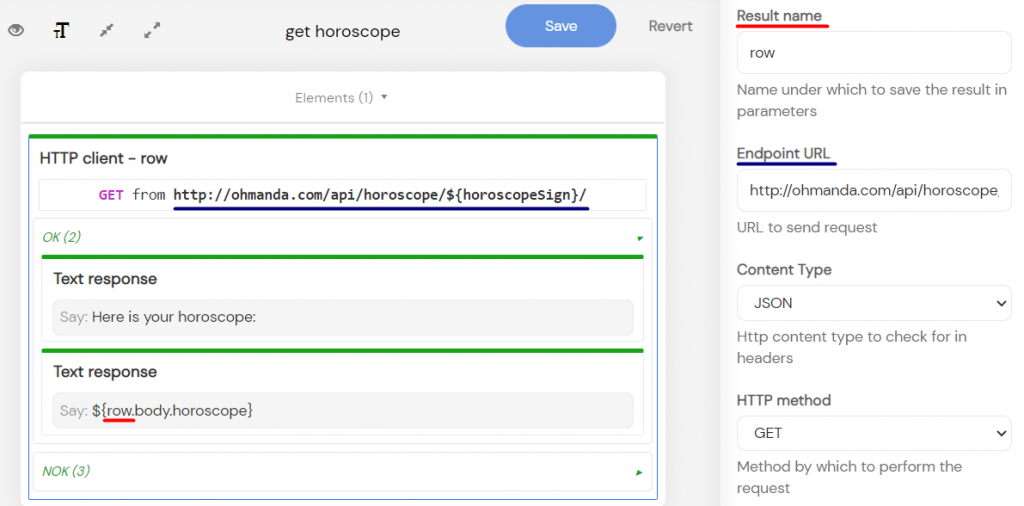
The HTTP client element performs an HTTP request to a specified Endpoint URL. It saves the received result body under the Result name.
The result can be saved under different Scope types – Session, Installation, or Request and either as a Service Param or a Block param.
You can learn more about scope types in the Expression Language guide.
The HTTP client element lets you select either the GET or POST method in the HTTP method dropdown. And depending on the request, you can also send Headers, Parameters, or a Request body JSON.
You can select the Content Type to check for in the headers. The default option AUTO can be replaced by the JSON Content Type. Also, you can enter Timeout to adjust how long a request should wait for a response in seconds.
The Cache Timeout value indicates the expiration time for a cache. This value is also expressed in seconds.
The HTTP Client element has two flows – OK and NOK. The OK flow is executed if the request was successful, and the NOK if it wasn’t.
You can access the result body in the OK flow: ${resultName.body.valueYouWantToAccess}.
To access the response status code and error messages use this syntax: ${resultName.status}.
Control structures
GOTO
The GOTO element stops current block execution and continues with the read flow of the selected block. You select the next block from the Block dropdown. You can call the same block again or select the current state, meaning read the block again.
To learn more about blocks, read our Blocks guide.
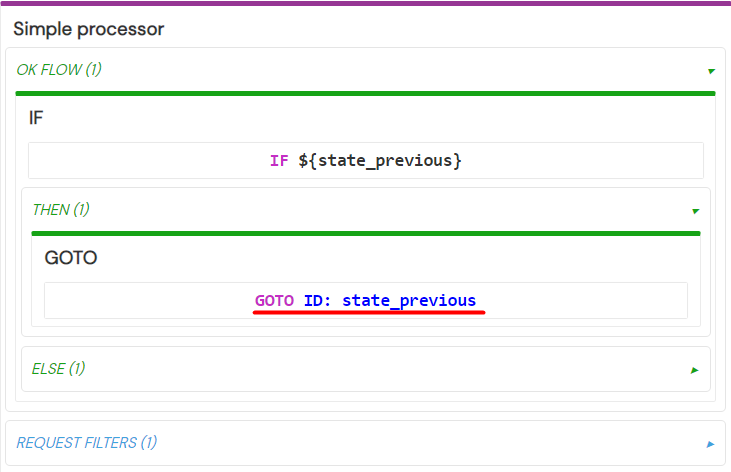
You also have the option to run the Previous state – call the previous block. However, these options, excluding calling the next block, can only be executed successfully from the process or the fallback flow of the current block.
Before trying to go back to the Previous state it’s best to test if the ${state_previous} variable was actually set.
Read Block Again
The Read block again element runs the current block again starting with the read phase. The element has no properties.
Run Once
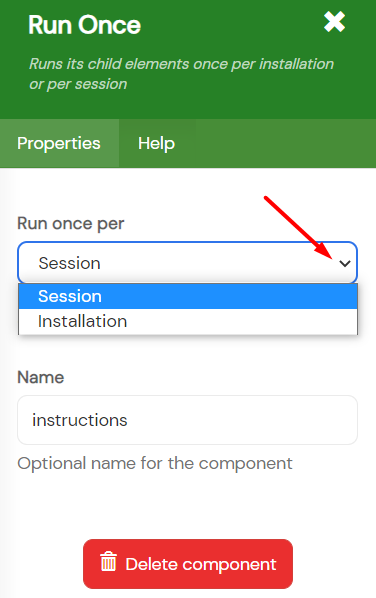
The Run Once element runs its Children elements either once per Session or Installation. It only has a Run once per dropdown property.
It can be used for running an element or a collection of elements only once per device installation or once per each session.
It has two containers – Children and Else. The Else container is run if it’s not empty and the Children container’s properties don’t apply.
INCLUDE
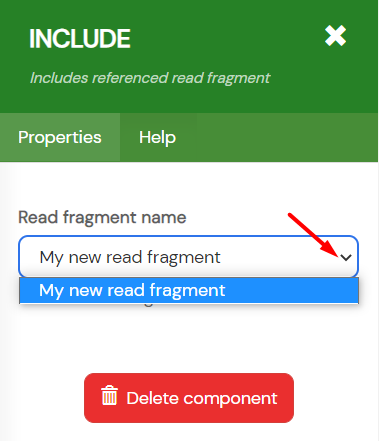
The INCLUDE element, not to be confused with the INCLUDE component in the Process section, includes and reads only a read phase fragment. You select the fragment’s name in the Read fragment name dropdown.
IF
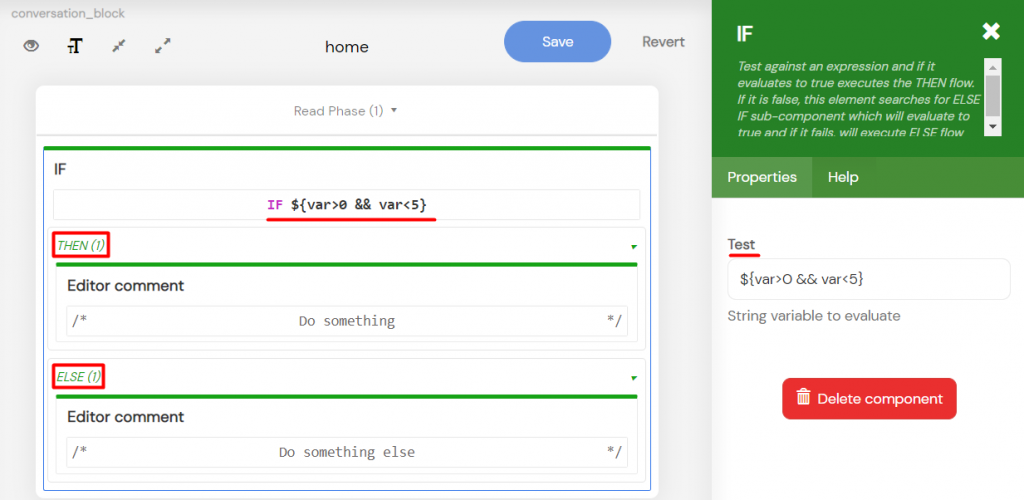
The IF element evaluates whether an expression entered in the Test field is true or false. If the expression evaluates to true the Then container is executed. You can place elements in the Else container to execute if the same expression is false.
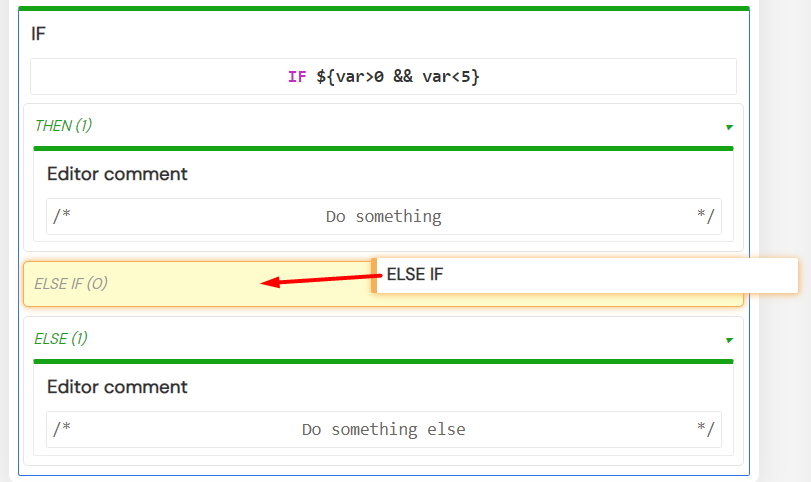
To use the ELSEIF container, you need to place the ELSEIF element in it.
ELSE IF
The ELSEIF element isn’t a standalone element and can only be used inside the ElseIF container of the IF element. Otherwise, it’s pretty similar to the IF element.![]()
It evaluates whether an expression entered in the Test field is true or false. If the expression evaluates to true the Then container is executed.
LOOP
The LOOP element iterates over items in a collection. For each iteration, the element stores the item in the Data collection item name variable. Using the Data collection item name variable, you can access the current item’s value, index, natural index, and check if it’s the first or the last item in the collection.
You have to enter the array expression that you want to loop through in the Items field. You can also Name the LOOP element thus making it more readable.
Adding Offset for the number of items to skip, starting from the beginning of the array, is optional, as well as entering Limit for limiting the number of iterations.
The element has the Elements container in which you can place any number of other elements.
FOR
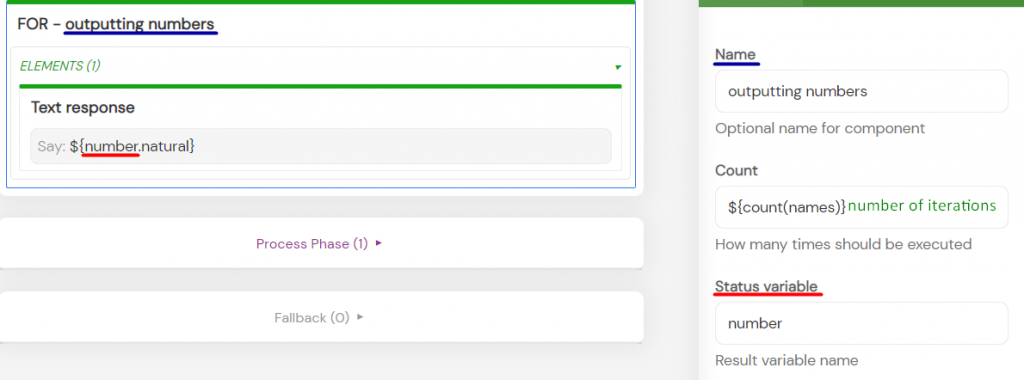
The FOR element is also a loop, but instead of items it iterates over a predefined set of numbers and executes Elements in the container of the same name once for each value.
You enter the iteration number in the Count field and using the Status variable name you can access the current iteration index and natural number as well as check if it’s the first or the last iteration.
Lastly, to improve readability, you can Name the element.
END Session
The END session element ends the session and exits the service. It sends the end session signal to the platform or the device that is being used.
Other
Set Parameter
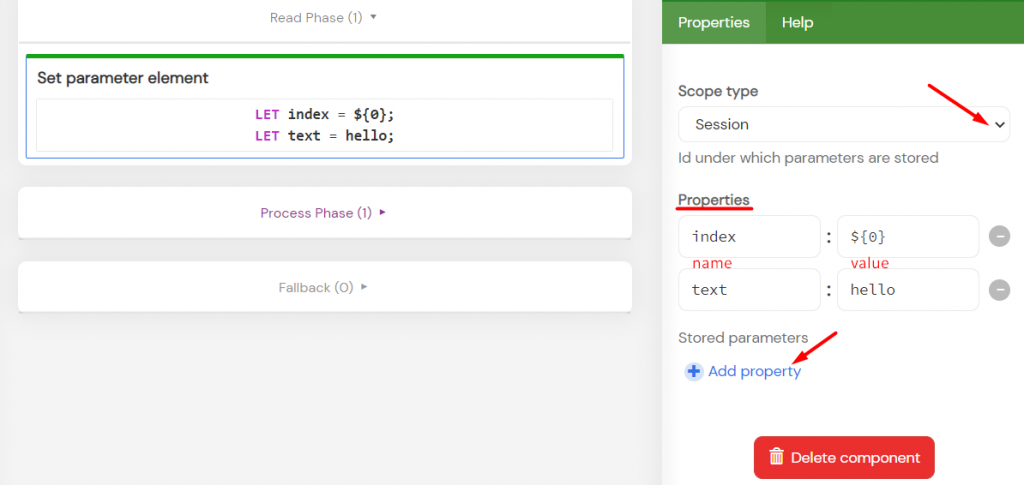
The Set Parameter element allows you to define and store variables (key-value pairs) at runtime, making them accessible throughout your workflow via Expression Language. These variables can be scoped for visibility and persistence, allowing you to manage their lifespan and availability effectively.
Key Features:
- Visibility Scope: Defines where the parameters will be accessible:
- Service: Available throughout the entire service.
- Block: Limited to a specific block.
- Parent: Limited to the parent component.
- Function: Scoped to a specific function (works only with the Request persistence scope).
- Persistence Scope: Controls how long the parameters persist:
- Request: Exists for the duration of a single request.
- Session: Available throughout the user session.
- Installation: Persists across the installation’s lifecycle.
- User: Linked to a specific logged-in user.
- Multiple Parameters: Allows you to define multiple key-value pairs at once, including complex data structures such as nested arrays or objects.
How to Use:
- Select the appropriate Visibility Scope and Persistence Scope for the variables.
- Enter the key-value pairs in the Properties field. You can use Expression Language to define values dynamically, such as:
trimmed : ${trim(text)}title : "My Title"myObject : ${{"key": "value", "other": []}}
- Add more variables by clicking the Add Property button.
- Access the variables in your workflow using their key names, e.g.,
${trimmed}.
Examples:
Creating an Array:
Here’s how to create a two-dimensional array, such as players[index]["name"]:
- Scope Type:
session - Properties:
players[0]["name"] : ${"John"}players[1]["name"] : ${"Jane"}
- Access the array items like this:
${players[0]["name"]}→ John${players[1]["name"]}→ Jane
Dynamic Arrays:
For cases where the size of the array isn’t predetermined, you can use a counter variable. For example:
- Properties:
players[${counter}]["name"] : ${user.input}
Function Element
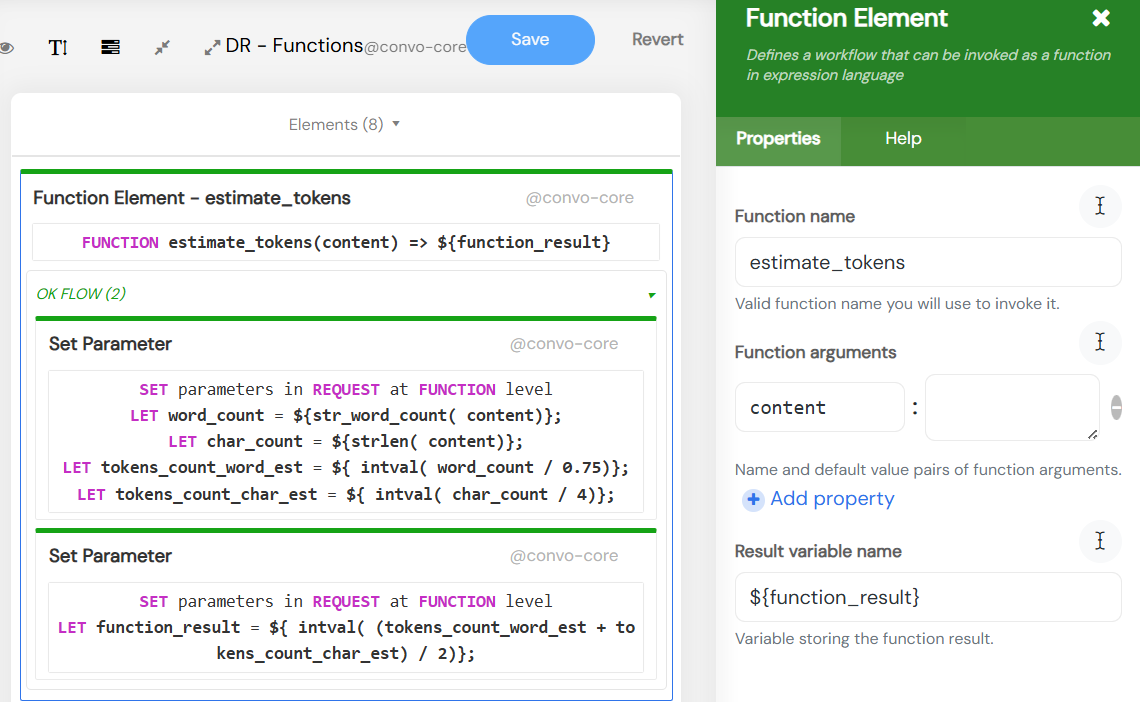
The Function Element allows you to define workflows and reuse them as Expression Language functions. Before calling such a function, it must first be registered (included in the workflow). These functions can also be used as callbacks for other functions.
The Function Name defines how you will call the function (e.g., ${my_function()}), while Function Arguments allow you to define arguments, their names, and optional default values. The OK Flow contains the workflow logic, and within it, you can access the function arguments by the names you defined.
The Result Variable Name is an expression that, when evaluated, returns the function’s result. This means that within your OK Flow, you must define a variable and set its value (e.g., using the Set Parameter Element).
The attached example demonstrates the embed_string function, which tokenizes a given string, sends it to GPT embeddings, and returns the resulting vectors.
Element Randomizer
The Element randomizer picks one child element at random and executes it. You can place the elements you want to randomize in its Elements container.
You can choose between two Element storage modes: Wild or Smart.
- Wild – picks random output every time and executes it
- Smart – picks different random output every time and executes it
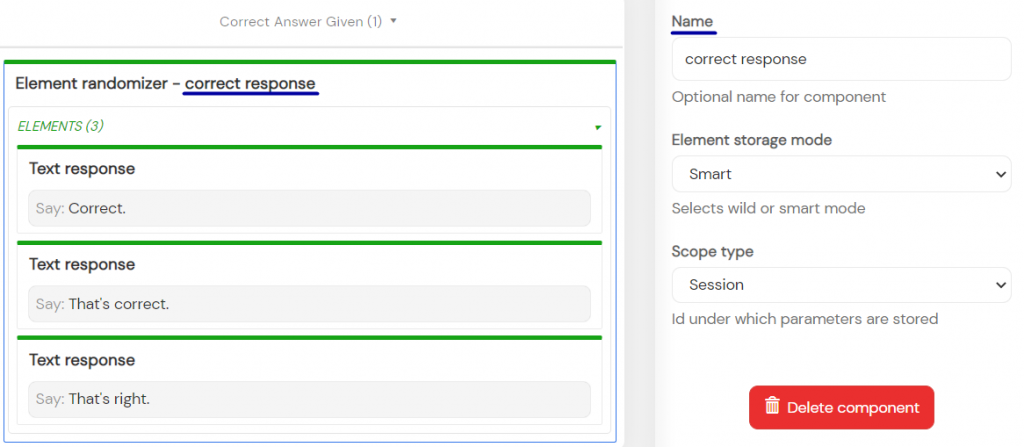 The Scope type option is primarily used for the Smart mode’s output. Lastly, you can Name the element to improve readability.
Editor Comment
The Editor comment is a simple element that is only used to display a comment in the Convoworks Editor.

